Showing posts with label Recipe. Show all posts

Monday, July 21, 2014

Shredded Beef Barbeque

Shredded Beef Barbeque

Everyone likes a super easy recipe that you just stick in the crock pot and let it cook on it's own all day, right? I know I do. It does warm up the kitchen a bit in the summer, but this recipe is too good not to make. My husband had specifically requested a shredded beef barbecue recipe so I found one to try and it was great!

Most of the time we go the lazy route and buy the stuff that is already made. Making it yourself is slightly cheaper and you get more out of it! It wasn't even hard to make either. 
 
 We even had the leftovers for dinner last night and they were still delicious. Ready to find out what recipe I used? It was adapted from one I found at tasteofhome.com. Check it out:

Shredded Beef Barbeque
  • 1 Beef Sirloin Tip Roast
  • 1 cup Ketchup
  • 1 cup Water
  • 1/2 Tablespoon Minced Onion
  • 1/3 cup Brown Sugar
  • 3 Tablespoons Worcestershire Sauce
  • 2 Tablespoons Lemon Juice
  • 2 Tablespoons Red Wine Vinegar
  • 2 Tablespoons Dijon Mustard
  • 2 teaspoons Chili Powder
  • 1/2 teaspoon Salt
  • 1/4 teaspoon Pepper

1. Place the roast in a 5 quart slow cooker. Combine all the other ingredients and pour over the roast.
 
2. Cover and cook on low for 8-10 hours or until meat is tender. Shred the meat with two forks and place it back in the sauce. 
 
3. Serve on buns or rolls as sandwiches. Enjoy!
 
Shredded Beef Barbeque


Want to stay updated? Follow me on Twitter, Facebook or even Pinterest! 
(This post might also be linked up to some of these lovely parties.)

Monday, July 14, 2014

Smothered Baked Burritos

I hope everyone had a great weekend. Can you believe it's the middle of July yet they say the high is only in the 60's today! Doesn't sound like a nice day but we don't have any outdoor plans. We're heading to the library this morning! 

We also finally ordered the babies' bigger car seats. They are 12 months old but are still using their infant seats that easily snap into the stroller. This makes going places with them really easy but they are finally getting too big for them. Once we get those new seats in we will have a lot more buckling in and out to do! 

This week I have a delicious recipe for smothered burritos that was very easy to make. We had it last week and still have leftovers so guess what we are having for dinner tonight! It's a recipe that was adapted from SkinnyMom and turned out really good! I'll definitely be making these again, probably next time we have burritos planned. Check out the recipe I used here:

Smothered Baked Burritos

Smothered Baked Burritos
  • 1 pound Ground Beef
  • 1 packet of Taco Seasoning
  • 2 cups Mexican Cheese blend, shredded
  • 8 large Flour Tortillas
  • 1/2 cup Sour Cream
  • 4 ounces Taco Sauce
  • 1 can Cream of Mushroom Soup

1. Preheat oven to 350 degrees. Spray a 9x13 inch baking dish with non-stick cooking spray.

2. Brown ground beef and drain the grease. Prepare the taco meat according to the directions on the taco seasoning package.

3. Mix the sour cream, taco sauce and cream of mushroom soup in a separate bowl. Spoon about 1/3 of this mixture in the bottom of the baking dish and smooth out.

4. Prepare the burritos by placing about 2 Tablespoons of meat and 2 Tablespoons of cheese into each tortilla. Roll and fold and place seam side down in the baking dish. 

5. Spread the rest of the sour cream mixture on top of the burritos and cover with the remaining cheese.

6. Bake for 20-25 minutes until the cheese is bubbly and melted. 

7. Top with your favorite toppings.
 
Want to stay updated? Follow me on Twitter, Facebook or even Pinterest! 
(This post might also be linked up to some of these lovely parties.)

Monday, July 7, 2014

3 Ingredient Crockpot Buffalo Chicken

3 Ingredient Crockpot Buffalo Chicken

Happy Monday! I hope everyone had a great weekend. This week my husband goes back to work on Wednesday after having about three and a half weeks off. It will be strange not having him around as much. 

We have a busy day planned tomorrow and Wednesday I'm going to attempt to take the three boys to the zoo by myself. It will be my first time taking them somewhere in the vehicle by myself, so wish me luck!

This past week I made something that I haven't made in awhile. It's a super easy crock pot meal. Only three ingredients! Buffalo Chicken Sandwiches are delicious and pretty spicy. It might be too spicy for kids to enjoy, but you could always add some cream cheese if you want to cool it down a bit. 

My little boy had a sandwich and wasn't sure if he would eat it but he gobbled it right down. So he's either really hungry or he really likes it because normally it takes him forever to eat just a couple of bites of his food. 

It makes a lot, too, so for our small family we can get at least two or three meals from it.

Here's the recipe if you want to try it yourself!

Crockpot Buffalo Chicken (recipe found at myfindsonline)

  •  3-5 pounds Skinless, Chicken Breasts, frozen
  • 12 ounce bottle Frank's Red Hot Wings Buffalo Sauce
  • 1 packet of Ranch Dressing Mix

1. Place frozen chicken breasts in the crockpot. Pour buffalo sauce over the chicken. Sprinkle the ranch mix on top of everything. Cook on low for about 5 hours.

2. Shred the chicken with two forks. Keep the sauce. Place the chicken back in the sauce and cook for about another hour. 

3. Enjoy your easy and delicious meal!


Want to stay updated? Follow me on Twitter, Facebook or even Pinterest! 
(This post might also be linked up to some of these lovely parties.)

Monday, June 30, 2014

Chocolate Cherry Bars

Chocolate Cherry Bars

It's Monday yet again. Do the weeks seem to fly by to anyone else? We had a really busy weekend and it's kind of nice to get back to normal again. My family came up to visit us and since we haven't seen them since Christmas, that was lots of fun. The boys even got to go swimming for the first time in their hotel pool. I wasn't sure if Superman would even try it, and he was very nervous about it at first, but he did let us take him in the water and had some fun too! The little boys were okay with it but Spiderman would not let go of me for anything. 

We had the big birthday party for all three boys on Saturday. That was a lot of work and it turned out pretty good. I'll post pictures of it later this week, we had a Curious George theme. And of course the boys got lots of new toys to play with, so our living room has been a mess ever since! (It's pretty much always a mess of toys anyways...)

I usually post a recipe every Monday and this week I made some Chocolate Cherry Bars! Yet another dessert, we eat too many sweets around here I think! But these bars were so easy to make and they were delicious. Here's the recipe if you want to make some too! 

Chocolate Cherry Bars

  • 1 package Chocolate Fudge Cake Mix
  • 1 can Cherry Pie Filling
  • 1 teaspoon Vanilla Extract
  • 2 Eggs, beaten

  • Frosting:
  • 2 cups Sugar
  • 8 Tablespoons Butter
  • 1/2 cup Milk
  • 1 cup Chocolate Chips
1. Preheat oven to 350 degrees. Prepare a 15x11 inch jelly roll pan with non-stick cooking spray.

2. Mix the cake mix, cherry pie filling, vanilla and eggs together. Pour into the pan. 

3. Bake for 20-30 minutes until a toothpick inserted in the center comes out clean.

4. Boil the sugar, butter and milk for one minute. Stir in the chocolate chips until melted. Pour this frosting over the bars when they are still warm. 

Want to stay updated? Follow me on Twitter, Facebook or even Pinterest! 
(This post might also be linked up to some of these lovely parties.)

Monday, June 23, 2014

Cookie Monster Dessert Bars

Cookie Monster Dessert Bars

If you have little children that are fans of Sesame Street or Cookie Monster they will love these bars! Perfect to make for a Sesame Street birthday party. My little boy loves Elmo and Cookie Monster the best, although we don't watch the show all that often. I made these delicious bars based on a recipe from Gal on a Mission. Of course you can make them with a different colored cake mix and call them something else, but I liked how the blue velvet turned out. 

They were super easy to make which is a huge plus in my book, it only takes four ingredients! They taste great too! It's always fun to have brightly colored food. Here's the recipe:

Cookie Monster Dessert Bars

Cookie Monster Dessert Bars 
  • Blue Velvet Cake Mix (or any other cake mix will work too)
  • 1/2 cup Unsalted Butter, softened
  • 1 Large Egg
  • 1 cup Chocolate Chips
1. Preheat oven to 350 degrees. Spray a 9x9 inch baking dish with non-stick cooking spray.

2. In a large mixing bowl, combine the cake mix, butter and egg. Mix until a dough forms. Fold in the chocolate chips.

3. Press the dough into the baking dish. Bake for 23-25 minutes or until the top starts to brown. Allow to cool completely before cutting. 

See what I mean, it's super easy! Enjoy your yummy bars!

Want to stay updated? Follow me on Twitter, Facebook or even Pinterest! 
(This post might also be linked up to some of these lovely parties.)

Sunday, June 15, 2014

Upside-Down Pizza Bake

Upside-Down Pizza Bake

Everyone loves casseroles and things you can just stick in the oven to bake, right? We tried this new recipe out this past week and it was soo easy to make. Upside-Down Pizza Bake is just what it sounds like. Pizza-like toppings on the bottom of the pan covered with biscuits and cheese. My little boy wouldn't try it for some reason, but my husband and I both loved it. It's an easy and fast family dinner!

I hope everyone had a great weekend. We didn't do much, some errands and then Superman hurt his foot and made it seem a lot worse than it was so I took him in and it was nothing. Silly boy! We got in and out of the clinic in like 10 minutes though so it wasn't too much of wasted time. We are having our garage sale this coming weekend finally. And this week is also my little boy's second birthday! He was born on Father's Day two years ago. My husband also has vacation the next three weeks, so that will be nice to have him around more. It will also be a little strange...hopefully we can get a lot done!

Here's the delicious recipe you've been waiting for. I found it on the Betty Crocker website.
Upside-Down Pizza Bake
  • 1 pound Ground Beef
  • 1/2 Tablespoon Minced Onion
  • 2-14 ounce jars of Pizza Sauce
  • 6 ounces of diced or small Pepperoni
  • 2 cups Bisquick Mix
  • 1 cup Milk
  • 2 Eggs
  • 2 cups Mozzarella cheese, shredded
1. Preheat the oven to 350 degrees. Brown the ground beef and drain. Add the minced onion, pizza sauce and pepperoni and heat until hot.

2. Pour into an ungreased 9x13 inch baking dish. 

3. In a medium bowl, mix the Bisquick mix, milk and eggs until blended. Pour over the meat mixture in the baking dish. 

4. Bake uncovered for 25 minutes. Sprinkle the mozzarella cheese on top of the crust and bake for another 5 minutes until the cheese is melted. 


Want to stay updated? Follow me on Twitter, Facebook or even Pinterest! 
(This post might also be linked up to some of these lovely parties.)

Monday, June 9, 2014

Hawaiian Ham & Swiss Sandwiches

Hawaiian Ham & Swiss Sandwiches

These Hawaiian Ham & Swiss sandwiches are very easy to make and delicious as well! I was looking for something new to make the other day and found this recipe on the King's Hawaiian website. It turned out great! The sandwiches are very messy to eat but it's worth it. We are definitely making these again. The recipe has them on the smaller buns, but I used the large sandwich buns and it was perfect. I could fit 6 just right into a 9x13 inch baking dish. 

 These yummy sandwiches are perfect for a quick dinner if you need one. You could even make them ahead of time, put them in the fridge and then bake them later. This is what I usually try to do because dinner time seems to be so hectic and all the kids are getting so fussy at that time of day. I try to make the dinner in the afternoon before it all gets crazy and then I can just stick it in the oven. So much easier for everyone!

Hawaiian Ham & Swiss Sandwiches

Hawaiian Ham & Cheese Sandwiches
  • 1 pound Deli Ham
  • 1 package Sliced Swiss Cheese
  • 1/3 cup Mayonnaise
  • 1 Tablespoon Poppy Seeds
  • 1 1/2 Tablespoons Dijon Mustard
  • 1/2 cup Butter, melted
  • 1 Tablespoon Onion Powder
  • 1/2 teaspoon Worcestershire Sauce
  • 2 packages King's Hawaiian Sandwich Bun

1. Spread mayonnaise on both sides of the bun. Divide your ham and cheese between the 6 sandwiches. Place them in the 9x13 inch baking dish. 

2. In a medium bowl, mix the poppy seeds, mustard, butter, onion powder and Worcestershire sauce together. Pour the sauce over the buns, covering the tops of them. Cover the dish with foil and let it sit for 10 minutes. 

3. Bake at 350 degrees or 10 minutes or until the cheese is melted. Uncover and cook another 2 minutes. 

Have a great week everyone!
Want to stay updated? Follow me on Twitter, Facebook or even Pinterest! 
(This post might also be linked up to some of these lovely parties.)

Monday, June 2, 2014

Cream Cheese Chocolate Cake Bars

Cream Cheese Chocolate Cake Bars

Are you looking for something yummy and moist and full of both chocolate and white chocolate to make for dessert? Well then you've found the perfect recipe! These bars are made with a Devil's Food cake mix and covered with white and dark chocolate chips with a layer of cream cheese on top of all that. They are also fast and easy to make, which is always a plus for me. And of course they are filled with delicious goodness so who wouldn't love them! I found this recipe over at Averie Cooks

We had pictures with the boys yesterday for their birthdays. They did not go very well at all, sadly. We did get a few good shots, but two of the boys were crying and not cooperating. My little Batman was great though, he was the only one that was happy to be there. I don't know when we will get a good picture with all three boys in it! But enough about our sad adventures in photography. Here is the recipe you've been looking for:

Cream Cheese Chocolate Cake Bars
  • 1 box Devil's Food Chocolate Cake Mix
  • 1/2 cup Unsalted Butter,softened
  • 1 Egg
  • 1 teaspoon Vanilla Extract
  • 1-2 Tablespoons of Cold Brewed Coffee or Water, as needed
  • 3/4 cup Semi-Sweet Chocolate Chips
  • 3/4 cup White Chocolate Chips
  • 1 can (14 ounces) Sweetened Condensed Milk
  • 1/2 cup (4 ounces) Cream Cheese, softened
  • 1/2 teaspoon Vanilla Extract
 1. Preheat oven to 350 degrees and line a 9x13 inch baking dish with aluminum foil. Spray the foil with non-stick cooking spray.

2. In a large bowl, combine the cake mix, butter, egg and 1 teaspoon vanilla and mix well. If you need to you can add 1-2 Tablespoons of coffee or water to help mix it together as it will be extremely thick. Press this dough into the prepared pan. 

3. Sprinkle the white and semi-sweet chips over the top of the batter. 

4. In another bowl, combine the sweetened condensed milk, cream cheese and 1/2 teaspoon vanilla. Pour this mixture over the dough in the pan, using a spatula to spread out evenly. 

5. Bake for 24-27 minutes or until the edges of the bars just start to brown. Allow the bars to cool well before cutting and serving them. 

Want to stay updated? Follow me on Twitter, Facebook or even Pinterest! 
(This post might also be linked up to some of these lovely parties.)

Monday, May 26, 2014

Brown Sugar Meatloaf

Brown Sugar Meatloaf

This Brown Sugar Meatloaf is easy and delicious! I've made it twice so far and it turned out great every time. It's very moist and covered with a yummy brown sugar glaze, doesn't that sound great!? We all loved it! Next time you are looking for a nice, easy comforting meal for your family you should try it out! I found the recipe over at Sweet Pea's Kitchen.

Brown Sugar Meatloaf
  • 1/2 cup Brown Sugar
  • 1 cup Ketchup
  • 1 Tablespoon Worcestershire Sauce
  • 1 1/2 pounds Ground Beef Chuck
  • 1/2 teaspoon Minced Garlic
  • 1 Tablespoon Worcestershire Sauce
  • 1/2 cup Milk
  • 2 Eggs
  • 1 1/2 teaspoon Salt
  • 1/4 teaspoon Pepper
  • 1 package Dry Onion Soup Mix
  • 1/4 teaspoon Ground Ginger
  • 3/4 cup Bread Crumbs or Saltine Crackers, crushed

1. Preheat oven to 350 degrees. Line your baking dish with foil. 

2. In a small bowl combine the brown sugar, ketchup and Worcestershire sauce. Then evenly divide it into 3 separate bowls.

3. In a large bowl combine the Worcestershire sauce, milk, eggs, salt, pepper, soup mix, ginger, bread crumbs and one of the bowls of brown sugar mixture. Add the ground beef and mix well.

4. Shape into a loaf and spoon one of the bowls of brown sugar mixture on top. Place ketchup side down into the baking dish and spoon the remaining bowl on top of the loaf. 

5. Bake for one hour or until internal temperature reads 160 degrees. Let stand 10 minutes before slicing. 

Want to stay updated? Follow me on Twitter, Facebook or even Pinterest! 
(This post might also be linked up to some of these lovely parties.)

Monday, May 19, 2014

Taco Pasta

Taco Pasta

Taco Pasta is basically exactly what it sounds like: a combination of tacos and pasta! Who wouldn't love that?! My little boy liked it so much he had seconds of it. I'm sure your little ones will like it as well. It's full of cheesy yumminess and lots of flavor. I found a recipe at The Seasoned Mom but changed it up a bit when I made it.

Taco Pasta
  • 2 cups Small Shell Pasta
  • 1 pound Ground Beef
  • 16 ounces Taco Sauce or Salsa
  • 1 can Cream of Chicken Soup
  • 1 cup Velveeta Cheese, diced
  • 1 cup Cheddar Cheese, shredded
  • 1 can Black Beans
  • 1 can Whole Kernel Corn
1.  Cook the pasta according to the directions on the box.
2. Brown the ground beef and drain the grease. Stir in the taco sauce and the Velveeta and heat thoroughly.
3. Drain pasta, mix the corn and black beans with the pasta in a large bowl.
4. Add the beef mixture to the bowl and mix everything together.
5. Put the mixture into a greased 9x13 baking dish.
6. Sprinkle the shredded cheese on top.
7. Bake at 350 degrees for about 20 minutes.

Hope you enjoy it!

Want to stay updated? Follow me on Twitter, Facebook or even Pinterest! 
(This post might also be linked up to some of these lovely parties.)

Monday, May 12, 2014

Hamburger Stroganoff

Hamburger Stroganoff

I've made this Hamburger Stroganoff a couple of times now and we all love it! It's simple to make and doesn't take long at all. If you are in need of a quick, easy dinner for the family this would be a great idea! It's something even the kids will love. I found the recipe over at Julie's Eats & Treats. I will definitely be making this again!

Hamburger Stroganoff
  • 1 pound Ground Beef
  • 1 teaspoon Minced Onion
  • 1/4 teaspoon Garlic Powder
  • 2 Tablespoons Flour
  • 1 teaspoon Salt
  • 1/4 teaspoon Pepper
  • 1 can Cream of Chicken Soup
  • 1 cup Sour Cream
  • Egg Noodles or Rice

1. Brown the ground beef. Add in the flour, onion, garlic, salt and pepper. Cook for 5 minutes and then drain off the grease.

2. Stir in the soup and simmer uncovered for 10 minutes. 

3. Stir in sour cream. Serve on egg noodles or rice. We used egg noodles but I'm sure it would be just as good with rice.

Want to stay updated? Follow me on Twitter, Facebook or even Pinterest! 
(This post might also be linked up to some of these lovely parties.)

Monday, May 5, 2014

Snickerdoodle Pie

Snickerdoodle Pie

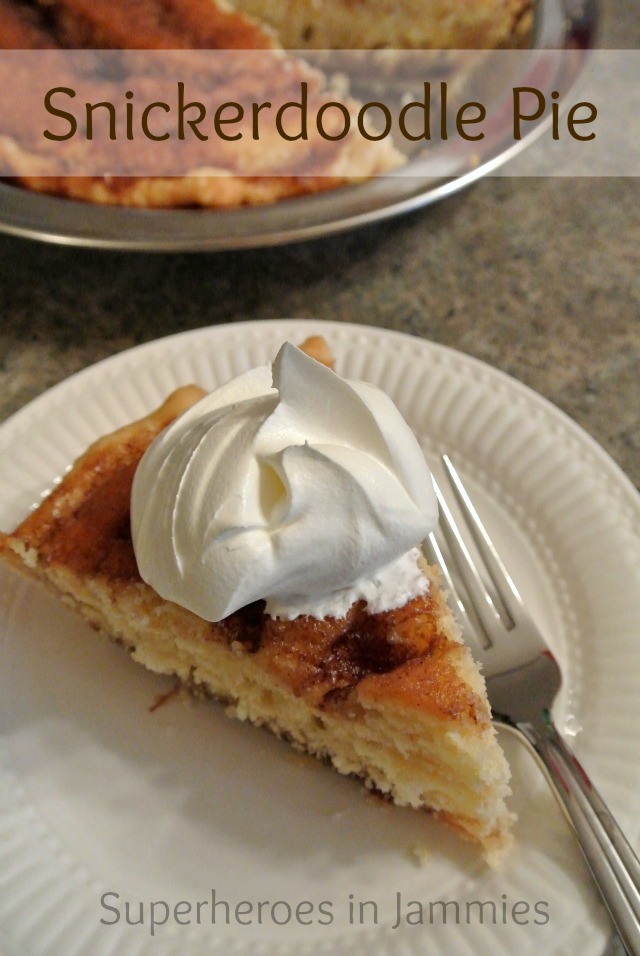
Do you love Snickerdoodle cookies or bars? I know the bars are my favorite dessert. Then I found this awesome Snickerdoodle pie! It's really yummy and makes your whole house smell delicious when you bake it! Almost as good as the plain old bars. The best part is the syrup on top that soaks down into the rest of the pie. It's perfect with some whipped cream or ice cream. Although I don't like either of those things, so for me plain is better.  

Snickerdoodle Pie
  
Snickerdoodle Pie (recipe found at Tastes of LizzyT)
1 Pie Pastry Shell
2 teaspoons Butter, melted
1 teaspoon Sugar
1 teaspoon Cinnamon

Syrup:
1/4 cup Butter, melted
1/4 teaspoon Cinnamon
1/2 cup Brown Sugar
2 Tablespoons Water
1 teaspoon Vanilla
2 Tablespoons Corn Syrup

Batter:
1/4 cup Butter, softened
1/2 cup Sugar
1/4 cup Powdered Sugar
1 teaspoon Baking Powder
1/2 teaspoon Salt
1/4 teaspoon Cream of Tartar
1 Egg
1 teaspoon Vanilla
1/2 cup Milk
1 1/4 cup Flour 

1. Preheat oven to 350 degrees. Place the pie crust into a 9inch pan. Spread the melted butter around the bottom of the pie crust and sprinkle 1 teaspoon of sugar and cinnamon on top. 

2. To make the batter, cream the butter and sugar together. Add in the powdered sugar, baking powder, salt, cream of tartar, egg, vanilla, milk and flour in that order. Combine until just mixed and spread into the pie crust. 

3. To make the syrup, mix the sugar, butter, cinnamon, water and corn syrup in a small saucepan. Bring to a boil and let it boil gently for 2 minutes while you stir it. Remove from the heat and add 1 teaspoon of vanilla. 

4. Slowly pour the syrup over the batter. Cover the edges of the crust with foil. Bake for 25 minutes then remove the foil and bake for another 20 minutes.

Snickerdoodle Pie


Want to stay updated? Follow me on Twitter, Facebook or even Pinterest! 
(This post might also be linked up to some of these lovely parties.)

Monday, April 28, 2014

Strawberry Lemonade Cheesecake Bars

Strawberry Lemonade Cheesecake Bars

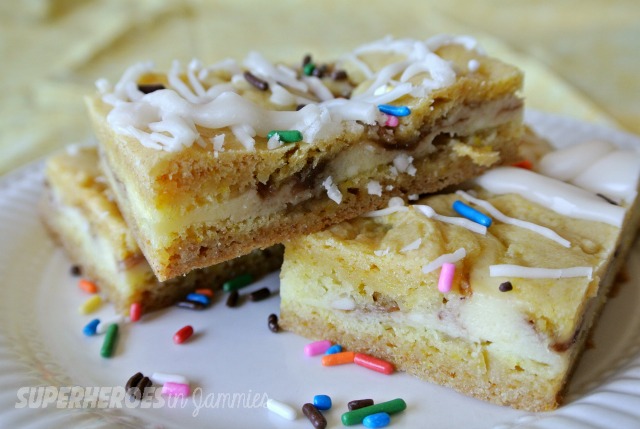
These delicious Strawberry Lemonade Cheesecake Bars were the perfect dessert for our Easter dinner last week. Of course they would be good anytime, full of yummy lemon and creamy cheesecake with a little bit of strawberry flavor added in. Just in time for spring...although right now our spring is pretty dreary, rainy and cold. It has to get sunny and warm soon, right!?! I need to get my garden ready to be planted in the next couple of weeks and I can't wait!

I woke up this morning to a dog whining and barking to be let out (not so great to hear) and my babies were laughing and talking in their beds to each other (this was the best!) They have been doing this most of the mornings and it's so much fun to hear the giggling coming from the monitor instead of crying. The only thing is now they also do this during nap time! And they are at that stage where they can pull themselves up on things but can't get back down. It's so cute though, I don't even mind going in there 100 times to lay them back down!

Now onto the delicious recipe! I think this is the first dessert I've had on here so far.
Strawberry Lemonade Cheesecake Bars (recipe found at Inside BruCrew Life)
  • 1 box Lemon Cake Mix
  • 1/3 cup Butter, melted
  • 1/3 cup Lemonade
  • 8 oz. package Cream Cheese, softened
  • 1/4 cup Sugar
  • 1 Egg
  • 1/4 cup Strawberry Preserves
  • 1/2 cup Powdered Sugar
  • 2 teaspoons Lemon Juice

1. Preheat oven to 350 degrees and spray a 9x13 inch baking dish with non-stick cooking spray.
 
2. Mix the dry cake mix, butter and lemonade together. Press half of this dough into the bottom of the baking dish. It will be sticky, some non-stick spray on your hands will probably help.
 
3. Beat the cream cheese and sugar until creamy. Add in the egg and beat again. Spread this over the dough in the baking dish.
 
4. Microwave the preserves for about 20-30 seconds and drop by small spoon-fulls across the cream cheese layer. Use a knife to swirl the preserves, carefully.
 
5. Flatten small pieces of the remaining dough and place it across the top of the bars. It won't cover every inch of it, but try to cover most of it. 
 
6. Bake for 30 minutes. Remove and cool for 2 hours. Refrigerate until completely chilled. 
 
7. Stir together the powdered sugar and lemon juice. Drizzle over the bars and top with sprinkles if you want to. Make sure you add the sprinkles right away or they won't stick. Keep the bars refrigerated. 
 
Strawberry Lemonade Cheesecake Bars


Want to stay updated? Follow me on Twitter, Facebook or even Pinterest! 
(This post might also be linked up to some of these lovely parties.)

Monday, April 21, 2014

Chicken & Rice Casserole

Chicken & Rice Casserole


Good morning everyone! I hope you all had a great Easter with friends and family! We had a busy and fun day. It was so beautiful outside which was awesome! We even got to go for a little family walk in the evening. I can't wait until we get our puppy leash trained so she can come with us too. 

Since it's Monday it's time for me to share another recipe. This one is a yummy chicken, broccoli and rice casserole. It's so easy to make too! While it might not look all that great, it's actually quite good. I've made it with cooked chicken as well as with canned chicken before and both were tasty. 

Chicken & Rice Casserole (adapted from Planet Weidknecht)
  •  3 Cups White Minute Rice
  • 1 Tablespoon Butter
  • 3 Cups Water
  • 1 Can of Chicken
  • 2 Cans Cheddar Cheese Soup
  • 2 Cans Fiesta Nacho Cheese Soup
  • 1 Cup Milk
  • 2 Cups Broccoli

1. Preheat oven to 350 degrees.

2. Boil 3 cups of water. Add in the 3 cups of minute rice and stir. Remove from heat and let sit for 5 minutes. 

3. In a large bowl, mix the chicken, soups, milk and broccoli. 

4. Fluff the rice with a fork and stir in the butter. Add rice to the soup and chicken mixture and stir.

5. Spray a 9x13 inch casserole dish with cooking spray. Pour the mixture into the casserole dish. 

6. Cover with foil and cook for 40 minutes. Stir before serving.


Want to stay updated? Follow me on Twitter, Facebook or even Pinterest! 
(This post might also be linked up to some of these lovely parties.)

Monday, April 14, 2014

Easy Tex Mex Chicken

I hope everyone had a good weekend! Ours was busy, we got everything we wanted to done. I sure wish the weekends didn't have to go by so fast though. Now it's Monday again and time for a new recipe on the blog! This week it's another Mexican type meal: Easy Tex Mex Chicken. It was so easy to make and it tasted delicious. My husband loved it and said to definitely make it again. It's a great choice for a dinner meal for the entire family!

Easy Tex Mex Chicken

Easy Tex Mex Chicken (adapted from Recipes for Our Daily Bread)
  • 4 Chicken Breasts
  • Taco Seasoning packet
  • 1-2 slices of cheese per chicken breast (I used 2)
Sauce:
  • 1/2 cup Sour Cream
  • 1/2 cup Salsa
Black Bean Mixture:
  • 1 can Black Beans, drained
  • 1 can Whole Kernel Corn,drained
  • 1 Tablespoon Chili Powder
  • 1 Tablespoon Cumin
  • 1 teaspoon Oregano
  • 1 teaspoon Minced Onion

1. Preheat oven to 350 degrees. Season chicken with the taco seasoning packet.

2. Bake the chicken for 25 minutes. Add cheese to the top of the chicken and bake 5 more minutes.

3. Combine black beans, corn and seasoning. Heat well. 

4. Combine the salsa and sour cream. 

5. Add black beans to the center of each plate, place a chicken breast on the beans and top with the sauce.

Easy Tex Mex Chicken


Want to stay updated? Follow me on Twitter, Facebook or even Pinterest! 
(This post might also be linked up to some of these lovely parties.)

Monday, March 31, 2014

Baked Chili Cheese Dogs

I hope everyone had a great weekend! The first half of ours was pretty good. We got lots of errands done on Saturday and then had a game night with friends on Saturday night. Yay! Then Sunday morning Superman woke up with some kind of flu and ended up throwing up all day long, poor baby. Otherwise the weekend went too fast as they always do.

I made something for dinner on Sunday night that I've only made one other time. It's super easy to make and your whole family will love it! We had it with fries...not the healthiest meal, but it sure was good. Check it out if you are looking for something fast and easy (as well as really messy!) to make for dinner!

Baked Chili Cheese Dogs

Baked Chili Cheese Dogs (adapted from Quick & Easy Recipes)
  • 8 Hot Dogs
  • 8 Hot Dog Buns
  • 1 Can of Chili with no Beans
  • Cheddar Cheese, shredded
  • Mayonnaise
  • Spicy Ranch
1. Line the inside of each hot dog bun with mayonnaise and spicy ranch. Fill with hot dogs and squish into a 9x13 baking dish.

2. Top hot dogs with chili and cheese.

3. Cover with foil and bake at 350 degrees for 45 minutes.

4. Enjoy your super easy and delicious meal!

Baked Chili Cheese Dogs


Want to stay updated? Follow me on Twitter, Facebook or even Pinterest! 
(This post might also be linked up to some of these lovely parties.)

Tuesday, March 25, 2014

Toddler Mini Muffins

Toddler Mini Muffins: A Healthy Snack


My oldest little guy used to be a really good eater. He wasn't picky and would eat everything I gave him. Lately he's started to not want to eat much at all, unless it's something he really loves. I have trouble finding healthy snacks for him to eat. Here is one that I have found that he usually likes (his tastes seem to vary by the day). My other little ones enjoy them as well.

These mini muffins are the perfect size for toddlers to eat. I made the batch and then froze it and can take one out when needed. They have lasted me quite some time now. I even tried one to make sure they tasted good and they actually do! Healthy and full of vegetables and they won't even know it. What other healthy snack items do you server for your toddler? I need some ideas!

Toddler Mini Muffins

Toddler Mini Muffins (adapted from Allrecipes)
  • 1/2 Cup Butter, softened
  • 1/2 Cup Brown Sugar
  • 2 Large Bananas, mashed
  • 1 Jar Baby Food Squash
  • 2 Carrots, grated
  • 2 Eggs, beaten
  • 1 Cup Flour
  • 1/2 Cup Oatmeal
  • 1 teaspoon Baking Soda
  • 1 teaspoon Pumpkin Pie Spice
  • 1/2 teaspoon Salt

1. Preheat oven to 375 degrees. Grease 24 mini muffin cups.

2. In a mixing bowl, cream together the butter and brown sugar until smooth. Mix in mashed bananas, squash, grated carrots and beaten eggs. Stir in he flour, oatmeal, baking soda, spice and salt until combined.

3. Spoon batter into prepared muffin cups.

4. Bake 15-20 minutes, or until a toothpick inserted in the center comes out clean. Cool in the pan for 10 minutes before removing to cool completely.

As you can see, Superman really liked them the first time he had them! (Also these pictures make me laugh)

Toddler Mini Muffins

Toddler Mini Muffins

Want to stay updated? Follow me on Twitter, Facebook or even Pinterest! 
(This post might also be linked up to some of these lovely parties.)

Monday, March 24, 2014

Pepper Jack Meatloaf


"You guys have your hands full!" That's pretty much what random people say to us all. the. time. Yes, yes we do have our hands full but it's great and I wouldn't change it for the world! I guess they just don't know what else to say to our three babies so close in age. Then they find out they are all boys and they think that's even worse for some reason...

So if you happen to be in the same boat as we are...with your "hands full" you might be looking for some easy and family friendly recipes to try. Well you're in luck! I am going to be sharing some great ones that we love right here! Lately my husband is all about the meatloaf so I've been trying different ones. This Pepper Jack Meatloaf is my favorite so far, you'll have to let me know what you think!

Pepper Jack Meatloaf

Pepper Jack Meatloaf
  • 1 pound ground beef
  • 1 cup celery, diced
  • 1/2 Tablespoon minced onion
  • 1 cup oatmeal
  • 2 eggs
  • 2 cups pepper jack cheese, shredded
  • salt and pepper to taste

1. Preheat oven to 400 degrees. Grease a loaf pan.

2. Mix meat, celery, minced onion, oatmeal, eggs, salt and pepper together well. Press half of the mixture into the loaf pan. Place cheese on top. Top with the remaining meat mixture and press down to seal.

3. Bake covered lightly with foil for 30 minutes.

4. Increase oven temperature to 425 degrees, remove cover and continue to bake for 20 minutes or until edges are bubbling and a knife inserted in the center comes out clean.

5. Let sit for 5 minutes, slice and serve!


Want to stay updated? Follow me on Twitter, Facebook or even Pinterest! 
(This post might also be linked up to some of these lovely parties.)
Related Posts Plugin for WordPress, Blogger...